Showing posts with label hand stitching. Show all posts

Monday, September 19, 2016

Home Again, Home Again, Jiggidy Jig!

I've been on another whirlwind vending and teaching trip and it's so fun to do those things, but so nice to get back home as well. It has been so enjoyable to meet so many women and teach them a few tips and tricks in the workshops. I love sharing those tips and tricks as well as turn the light on for something new to someone. We all enjoy getting excited about doing something new and it's so fun to share that joy! Now it's time to finalize preparation and plans for Market and Festival! Will you be attending? I'm in row 7 so be sure to come see me!

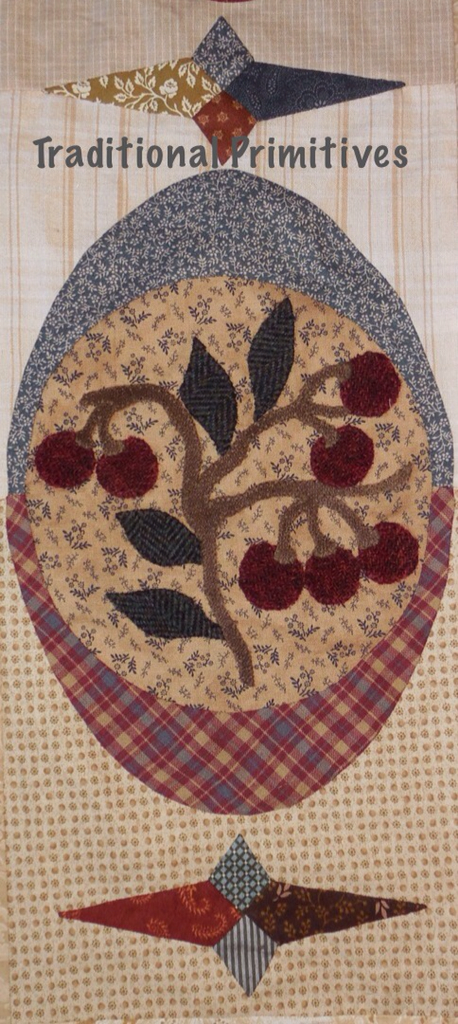
One of the things that gets ladies so excited when they see it for the first time is Punchneedle! It's exciting to see many interested in this old art because I feel like it is a dying art. Not many shops carry Punchneedle and I fear it may be gone if we don't start getting new folks to enjoy the art. It is super easy to learn and so quick to finish the project. As many of you know, I have a different way of presenting the final product and love to make mini quilts from my Punchneedle projects. Here is a new version of one of my first Punchneedle projects as an adult.

A few years ago I sold my sample for the Punchneedle project titled My Primitive Baltimore. I should have never done so...I miss that special project because it was finished so uniquely. I've found time to make another one and decided to add it to my collection of mini Punchneedle Quilts. It's simple in its finish with big stitch quilting all around the design and a simple binding. Can't wait to have my mini quilt wall up in the house once the year of shows is over for a few months until they begin again! This will be a nice addition! The pattern is available for purchase on my website if you are interested HERE. (Look at the bottom of the page)

"I'm working on a Woolie version now and it's turning out nicely! It's been a while since I have been able to hand stitch and once again it's so nice to enjoy that peaceful time. It's football season so I'd better get some more stitching ready! (I stitch while my hubs is watching EVERY game! Haha! ). The fabric in this project looks like wool, right? Well it's not! It's a new Moda Line from Minick and Simpson called Cotton Works. It's thick and so nice to handle. Everyone I've shown this little project to thinks it's wool and then they get close and have to do a double take to see what the fabric is! For those of you who are allergic to wool, try to find this line at your local quilt shop and check it out! I am using Genziana wool thread and I'm taking very small stitches to cover the raw edges of the cotton Applique. I do love working with the Genziana wool thread because it is so nice to stitch with as well as it looks so nice. This wool thread also lets the beauty of the fabric show through and be the highlight of the project. Most of the time I prefer to use the whip stitch when stitching Wool Applique, but for this project I'm using a very small blanket stitch. Remember this specific project is made from cotton, so I want those edges covered well. This thread does the trick! You can find it on my website on the Notions Page HERE.
See how beautiful this fabric is up close and personal?!

This is another new pattern called Spool Candle Holder Quilt Cozy. Talk about a fast little project! It can be done in no time and the kit comes with the spool candle holder. It's about 5" tall and let me tell you these spools were hard to find. I have a limited number available while they last! You can find them HERE if interested. They would be darling in wool as well.


I was thrilled to see my quilt Pennies In My Garden on the cover of Simply Vintage! I never dreamed that would happen! We have a few more of these lovely magazines left if you'd like one for yourself. Inside you will find many lovely projects including one of my other small quilts, A Warm Welcome. The way the designers of this magazine present the projects is so lovely. A joy to look through again and again. You can find the order button on my home page at TraditionalPrimitives.com

New on the website along with the needles and patterns above are kits for various quilts. We are asked so often if we have kits, I've started making a few here and there when I have a moment. You will find them in the choices on the shopping buttons when they are available.


The next big project I'll be attempting is to organize my sewing room again. Remember that photo from about two years ago when we had a graduation party? We had to literally shove things back into a part of the room so we could use the basement for the party. I promised to show a photo when the room was all fixed up. If you read my blog often, you may have noticed I've not shown a photo of my nice organized room. This would be because it has NOT happened yet! I don't even know where to begin... So November is set aside for organizing my room. It will probably never be a pretty studio like I see in magazines, but my hopes are that it will be well organized. I plan to label things at least for a while so I don't have to spend a lot of time searching for specific things. Is there anyone else out there who needs a reorganization of your sewing space? Would you like to join me for a Sewing Room Oganizing Challenge to show our spaces and be inspired by organizing ideas from others? Let me know and we can link up on a certain date in November. I need some inspiration! Want to join me?

As a beginning to this Dear Hubs has taken the old ping pong table and attached it to a big long table frame we had on hand. So now I do have a large table to work on and hopefully I can figure out a way to keep the projects and piles below and break the habit of a multi project filled table. Recently I purchased a few plastic storage drawers to put under the table. I had visions of it looking beautiful, but for now I'll just use plastic drawers. Perhaps once I get organized I can transport the projects to something prettier. That's the first step in my reorganization plan...having space on my table to work from! Yay! It's a small thing to be excited about, but it's a beginning.

Well, back to work I go! Sorry if the blog seems to be a sales pitch today, but with so many new items on the site, I want to make sure you know where to find them! Don't forget to let me know if you want to join me in the Sewing Room Organizing Challenge! Thanks so much for stopping by today and as always,

Take Care,

Missie

#showmethemoda


Friday, May 29, 2015

Needles...Makes A Difference!

Today I wanted to share with you a bit about needles. Many people have asked me what needles I like to use for different types of sewing. As a novice, I didn't think it mattered much, but as I got more experienced, I realized a good needle really makes a difference!

I have had my own brand of needles made.   You can buy them HERE!

 I use a size 10 or 11 depending on the light available at the time.  These two needles feel the same as they glide through the fabric, nice and smooth. They work well for Applique because they are thin enough to leave no hole in the side of the fold while stitching. A very nice smooth needle turned edge!

For English Paper Piecing I like the very same needles. They glide through the edges of the two pieces and the narrowness of the needle will not leave much of a hole. There is one difference here. If I am sewing the pieces together WITH the paper in, I use the size 10, which is a larger needle. The larger size will resist going through the paper and thus you can reuse your papers, plus, the stitches won't show on the front after the two pieces are sewn together. If I am sewing the pieces together WITHOUT the papers inside the pieces, which you know is possible if you've seen my starch basting method, I use a size 11 so that the needle can glide right through the edges of the pieces and will not show on the front. These needles are great for my handwork Piecing and Applique needs!

In the picture above you will notice that I also have branded Wool Applique Needles.  These are longer, sharper and thinner than most designers use for wool applique.  I like a sharp needle that I can hold onto and these work great!

The new Punch Needle And Primitive Stitching magazine arrived and I am excited to share my project fearured in the magazine, the Memory Keeper Journal Cover. Looks like this will be another great primitive magazine for all of us who love that touch of Prim! There are many darling projects in this Premier Issue!
L
Thanks for stopping by!
Take care,
Missie

Friday, November 7, 2014

The Gardens Of A King, Part 4

Ok, time for some more sneak peaks at my interpretation of the King George III Coverlet! Yesterday, I left you with a summary of the techniques used to make the quilt. To review, there is English Paper Piecing, Appliqué and Wool Appliqué involved in making this quilt, The Gardens Of A King.

This picture shows a bit more of the two Appliqué techniques. Usually, I do cotton Appliqué using the needleturn technique, but for this one, since I was used to the crisp shapes from starching the EPP pieces, I decided I would try the starch method for the cotton appliqué also. A first for me. It was very nice to just stitch them on with no needle turn since the seams were prepared before they were basted to the background. Very quick stitching for sure! Either method would work just fine, but I wanted to try something new with the curved shapes of the crescents surrounding the Wool Appliqué. I did, however, use Needleturn for the some of the sharks teeth as well as starch for some of the others. I was experimenting. I would say the starched teeth are more precise, but the needleturn version quality is fine enough for me.

Making a quilt like this must be about enjoying the process! We love quilting and stitching because it is enjoyable! We may each love different methods of reaching the end of the project, but as long as we enjoy the journey, that's what it is all about! Right?!?

For me, this is definitely an English Paper Pieced design for the pieced blocks, but recently, I've met a woman who loves these type quilts, yet she prefers traditional hand piecing where she traces the shape and sews the pieces together with a running stitch! This traditional technique of piecing will absolutely work for this quilt! It's about the process of enjoying the work of making the quilt! I find myself often thinking about the original maker, wondering which type of piecing she used. She was, after all, from England so I do suppose she could have used English Paper Piecing to piece her blocks. I have tried to find out how old the technique is, but can't seem to find any information about a quilt known as the first English Paper Pieced Quilt. If anyone does know this, I would love to learn about it from you.


There are also several ways to stitch Wool Appliqué. Many primitive artists use the blanket stitch with pearl cotton or 3 strands of floss. It's beautiful done that way, but I have decided I prefer my stitches to blend in with the wool. My quilt design style is a bit primitive to go along with the traditional, but a bit of a more formal primitive touch is how I see my style. With that said, I prefer to use wool thread when I do wool appliqué. I've used several stitches, but prefer a small, simple, whip stitch. You can see some of the thread shining in the flash of the picture above. But, whichever type of thread or floss you like, would work wonderfully on these appliqué blocks.

Some of the wool shapes are very narrow, so for these blocks, I used fusible Steam A Seam 2 Lite to hold them in place and seal the edges from raveling. Now that I've gotten rid of my 25 year old iron, the Steam a Seam worked great! Lots of steam IS the key, even when I thought I HAD lots of steam in the past! Most of the time, I prefer not to use fusible when I do Wool Appliqué because I prefer the softer feel. Again, it's all about enjoying the process and whichever way you prefer for the majority of these appliqués is what you should do! (I do highly recommend fusible for the stems though!)


Be sure to visit Karen and Carrie's blogs to see their updates about The Gardens Of A King that they've been working on. You'll see some great changes from mine to make it their own so that they enjoy the journey of making the quilt!

In the coming weeks I'll be posting some hints and reviews of how I prefer to do things. One of which will be sharp points like the few you see above! But first, I'll be posting the quilt top, The Gardens Of A King, for you tomorrow... Nice to see you here today and I hope to see you here tomorrow!

Until then,

Take care,

Missie


Friday, March 7, 2014

One Last Post About Texas

I just have a few more inspirational pictures to show you from my trip to San Antonio. You know how I love STARS! It wouldn't be a good showing of pictures without a few more stars! I think this one is one of my favorites...it is on a railing in the airport...sure wish it was on my back porch!

The others were in a few shops I found during the trip. Isn't this a nice star clamped onto that pole for fancy jeans? I like those jeans too, but I like the star better!

Here's that Texas Star again on this rack of cowboy hats. Can you just imagine that square unit as a quilt block? I do have a Texas Star Quilt started...only a few block are in the makings when I have a few moments.

I'm sewing it the old fashioned way using the Ardco metal templates, a pencil and sandpaper for easy marking of the lines. It's very peaceful sewing. Can you see those lines drawn on the back of that fabric on the left? I love these templates because they are so easy to trace around. One side is rough so it grabs the fabric a bit. You will only need one because they don't wrinkle or fall apart!

I've shown examples of the metal templates above for several blocks, but I think a friend has the templates for this block. I have plenty drawn to keep me busy for a long while!


All of those 10" squares of fabric have the backs filled with shapes ready to be cut and sewn by hand. If you look close, you can see the faint pencil line drawn on the back of the top fabric. This makes me excited to get this bundle out and start sewing on it again! Maybe this will be my next no brainer stitching project! I wish I had some extra time so I could work on it, that's for sure!

Have a wonderful weekend and thanks for stopping by today!

Take care,

Missie