Showing posts with label quilt. Show all posts

Thursday, January 17, 2013

And Here Is The Housewarming Quilt!


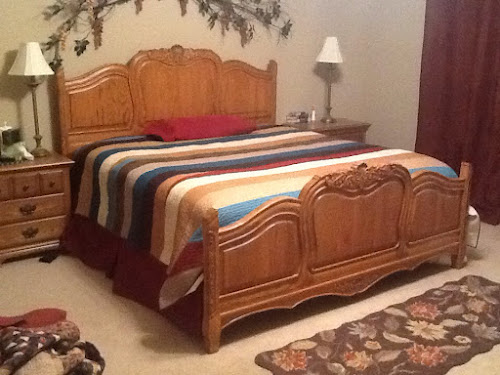
My bed, Their quilt! It's ready for the movers to pack it up tomorrow! Fits my bed well, so it should fit theirs also. They have modern furniture so the style will match better.

Here's a close up view of a few of the accent stripes. This was such an easy quilt to make...6" strips, 3 widths wide for king size...wack 4 strips off at the angle shown below, sew 'em together quick and quilt! Voila' a modern styled quilt for Dear Daughter and Son In Law!

Take care,

Missie


Wednesday, January 16, 2013

More On Binding My Way...

I had quite a few questions as I replied to comments on the binding post yesterday, so I will try my best to explain how I do bindings for you today.

First, cut 1 3/4" strips. This can be done on the straight of grain or on the bias. I prefer bias strips, but forgot to take a picture that way! The quilt I am binding now is done with strips cut on the grain as shown because I was short on fabric.

Then sew the strips you just cut together lengthwise. You can see my seam here.

Then press the whole length of the long strip you now have. I sometimes will fold off center just a bit if my batting is thicker or will poof up a bit after it is washed. You can see the wrong side of the fabric peeking out in the picture below. I will also do this if I want a bit larger than my normal quarter inch binding. If this is the case my seam allowance needs to be a bit larger than a quarter inch also! By pressing off center a bit, basically I am giving myself a wider folded strip.

Then, lay the binding, open side to the edge of the quilt edge. Stitch 1/4" away from the edge, about where the scissor point is laying. I usually use a walking foot to prevent wavy edges, although I am not sure it helps me at times.

After the binding is sewn on all around the quilt, fold the binding to the back side and clip in place, covering the stitch line.


See how I am barely covering the stitches from where the binding was sewn on.

Then, when you stitch the binding down, hold in place as if it were appliqué. The clip will assist in making this easier. When you reach the clip, move it forward a few inches.

Now does this make more sense?


Tuesday, January 15, 2013

Binding Time!

The quilting is done and now I am binding DD and SIL's new quilt! The good news is that it will be done in time for the movers to pack it up and take it to Georgia to their new home. The bad news is that it is over 400" of binding! Ha Ha! Ginger feels the same way I do about binding!

She is snuggling up to it this morning. Last night she was laying on the part that was at my feet while I stitched one side of binding down. I had to keep moving her as I adjusted the quilt to get to the next part for stitching. I guess she is making sure to get the snuggles in before the quilt goes to it's new home. Funny how pets love to snuggle on quilts!

She had a good report on her broken leg last week! It is healing well. She now has freedom to walk slowly on the wood floor and have freedom throughout the main floor of the house. No big flight of steps allowed yet, but she got a little energetic and ran up and down when we weren't looking! So now we are doing the baby gate thing for a few more weeks while we build her strength back with daily walks. She is still limping a bit at times and I hope that will go away soon. I hate that she is hurting even a bit when she walks!

How do you like to make a binding? I cut bias strips 1 3/4" wide, sew the strips together and then press the long length in half. Actually I offset this seam a bit as you can see in the picture below. It is offset about a scant 1/8". I use a walking foot and a 1/4" seam when stitching on the folded binding.

Using this method gives me a nice small binding. I like to use one goodie clip as a pin to hold the folded edge in place a bit as I stitch up to it. I only use one clip because it is easier to handle one as you move it along the binding. Using more clips ahead of my stitching does not do me any good because I am placing the binding in it's exact place one stitch at a time. I usually place the clip about 4" ahead of my stitching and work up to it as shown in this picture below. The clip helps me get the folded edge in the approximate location needed and reduces the pull the binding makes with the double layer as it is folded to the back. Make sense?

Have a great day and take care ! I will show a picture of the quilt on a bed when the binding is done... Until then...

Missie


Sunday, December 9, 2012

Cute As Can Bee!

Thank goodness I finally felt well enough to get something done in the sewing room today! I've been coughing for about a MONTH and am finally kicking this bug. I have slept well for 3 whole nights and my energy is coming back! Good thing because I have a Christmas party to go to on Tuesday, so needed to get my gift done. I started this little Bee quilt last night and finished it up just now. It was fun to make and simple simple. Can't wait to give it to my Secret Pal! ( She does not follow my blog, so the secret is safe!) It turned out about 10" square. The center is punched of course...! This is the quilt group called "Rather Bees", short for "I'd Rather Be Quilting", now shortened to "Bees". This group started more than 25 years ago and most of us have a bit of a Bee collection!

Ginger is napping on this little rug like it's a pillow! I couldn't resist a pic next to this little quilt. She seems to be a little better, but still has much healing to do before she is back to normal. She even did a bit of playing today!
Have a wonderful week! Take care,

Missie


Thursday, July 19, 2012

My House on the Hill


Just finished up revamping My House on the Hill in Valdani pearl cotton 12! This is a mini quilt, 12" square. These are so fun to lay around the house or hang on the wire hangers that are so popular now. I have several different little quilts hanging out of baskets and laid out on coffee tables. So nice to finish up another project! This pattern is available at Traditional Primitives HERE if you are interested!
Take Care,

Missie

PS... Here's a nice give away I stumbled on...cute blog!

COBBLESTONECORNER AND GRANDMAS BISQUITS, 50 FOLLOWERS GIVE AWAY! ENDING JULY 25TH...


Thursday, July 12, 2012

Happy Belated Holiday and thank goodness for cooler weather!!

I hope you all had a wonderful Fourth of July! This is an antique quilt I saved a picture of long ago. It's one of my favorite patriotic quilts of yesteryear.


We just got home from a trip to see family and attend a wedding in hot hot Indiana! My goodness it was HOT and humid. I feel for all the folks stuck in the heat wave with no power all these days. So glad cooler and less humid weather arrived today! We attended a wedding Saturday and we were sure glad the church and reception were nice and cool! Always fun to see a new couple in love getting married!


I finally have time to post a good pic of my wool Quilt, Charmed Beginnings, made from Blackberry Primitives wool. It's lovely wool to work with.  All pieces are appliquéd. No piecing except for putting the blocks together. This is a pretty quick quilt to put together as wool appliqué is so easy since there are no seams to turn under. It is hand quilted in primitive stitches with Valdani 12 pearle cotton. Hmmm...gives me the itch for another wool project!


We came home to blooming hydrangeas...the only thing that was not burned up in the heat! I'm glad to have enjoyed these a few days.

I hope your weather is pleasant where ever you are...we are pleasant in Iowa the last few days! Take care!


Monday, June 25, 2012

Away at the Beach! Punchneedle was an easy project to take along!


Last week we went away for a visit to Orange Beach, Alabama. A beautiful place for sure! Here was the view from our balcony while I did a little stitching. The sound of the waves was very relaxing and when I'd had enough watching the waves roll in, I picked up my project.
 

For those of you who have not done punchneedle, this is how it looks as you begin punching the shapes. They are a bit messy, but as long as you stay within the lines, the shape will sharpen up nicely when you fill in around it. Notice the berries and pineapple shapes...before and after filling in a bit!


I am auditioning background colors for the blocks in this little punchneedle quilt. I don't think this is quite right, yet I do like the varigated look.

Here you can see I have added a bit of solid ivory around the star.

Punchneedle was a great little project to take along on my trip. I was able to check with TSA at the check in desk and they approved me taking the needle on board. It was flat and small in my carry on bag and I got quite a bit done when I felt I was being to idle with my hands. I took it to the poolside, worked on it on the balcony and at the airport. You know us quilters and stitchers can't be empty handed for long!

Have a great day!


Saturday, June 16, 2012

Rainy Day Projects...


I am plugging away at quilting The Appliqué Group charity quilt. Today it's been hot and rainy so I am working on lots of little projects inside. The pebble quilting you see above makes my hands tired so I am only working on it in small spurts of time!


When my hands are resting from quilting, I am working in little bits on other projects. This is a new punchneedle design I have started. It will be another mini quilt with punchneedle in the center. I can't wait to get going with more colors!

Have a nice relaxing afternoon!

Friday, June 15, 2012

Mmmm Fresh Salad Please!

We moved to Iowa about 8 years ago from a 2 acre lot to a standard cookie cutter sized lot. We had a big garden in Ohio...squash, strawberries, tomatoes, peas, etc. Here, I have learned to mix the veggies in with my flower pots on the porch..it makes for a small garden, but it works! This year I only have tomatoes and lettus, but it will be enough for a few fresh salads now and then!

The big pots of light purple petunias all came back naturally from last year! We thought they were weeds, but then noticed they were petunias. It was nice to have those pots ready to go at planting time

Spinach is in the three tiered planter...can't hardly see it since I just cut it! More leaves will be grown in a few days though! On the right is my new Stawberries 'n Cream Hydrangia ...the blooms are only yellow so I need to figure out what nutrients it needs to get the pink color to come!

The back porch flower garden...helps us feel a little less closed in and gives us something nice to look at besides the neighbors! LOL. You can see the lettus bowl on the railing next to the three tiered pot where the lettus is growing. My tomato plant is just off view of the camera to the left and has some nice tomatoes ripening. When the lettus is done we will put out more seed for the next round. Lettus grows quickly so it works well!

And since this is a blog about quilts...here is an old quilt I made in the early nineties during the mauve and blue phase of my life. It is called Cottage Flowers. I haven't had it out for a while, so it's nice for me to see it again! Have a great weekend!


Saturday, June 2, 2012

I LOVE English Paper Piecing!

G'Morning! Nothing more relaxing on a Saturday morning than sipping coffee and doing a little stitching!
This is my latest little English Paper Piecing project. I LOVE to work with this technique! You can take it with you very easily (Notice my little gold carry case-I've been dying to use it for something!), prep is easy and stitching the pieces together is easy! You may have seen my big fancy Anniversary Quilt to celebrate 25 years with my Hubs on my website. Hallbrookdesigns.com and on my blog profile page. Be sure to take a look at the website and read the description on both the Pattern page and the My Favorite Things page. The center hexies were done with the English Paper Piecing technique and that's how my obsession started...I am hooked!

You can see in this close up pic the basting stitches on two pieces...top left dark blue and top right dark purple. Using traditional basting stitches is the way most folks do this, but not me! I only used basting stitches on a few pieces because I was stitching in the car and needed a few more pieces and was in a bind without my trusty glue stick.
When I started on the hexies, I found I was just to lazy to baste those seams around the paper pieces! Yep...just too lazy! Actually, I couldn't do a good job on the basting.  I have taken several appliqué classes from many famous artists who use washable glues of all kinds on their quilts. I decided to try out glue sticks with my hexie pieces. LOVED how quick it was! I could prepare dozens of pieces in only a few minutes! This was for me! The other trick was that I accidentally printed the hexie pieces on photo paper instead of card stock. The photo paper worked perfect with the glue stick! The fabric pops right off when you are ready to remove the paper due to the slick paper finish. But it is important to wash out the glue before finishing the quilt. Sometimes we want to wash a quilt, but other times we like to leave the fabric unwashed...

For this project I am experimenting with purchased Paper Pieces (to save me cutting time) shown above as well as 404 Spray and Fix Repositional Adhesive (spray on repositional glue). This glue works like a sticky note glue. I am spraying it on in two thin coats and so far, it is working wonderfully! All you have to do is spray the paper, wait 45 seconds, repeat, and then place the unsticky side onto the back of your fabric piece. Fold the edges over onto the sticky paper and Voila!, the basting is done! I am having to spray again when I want to reuse the papers, but it is so easy, it is still quicker than the gluestick or basting with thread. The advantage of the spray glue over the glue stick is that it comes off the paper much easier and leaves no residue to wash out of the fabric... It's an option for some who want to use a different technique. 

***UPDATE- This has become a sticky mess and I have now developed a technique for Starch Basting EPP!  See the tab at the top of the page!!

I am just about done with the piecing on this project. This will be the center of the small quilt and then I will appliqué the borders...most likely a pineapple theme...will show you more soon! The finished project will be available as a pattern.
Tuesday, May 1, 2012

Spring has Sprung and so has my Blog!

Good Day and welcome to my new blog! I hope to bring you inspiration to get some fun quilts and projects done! I am a a wife and mother of three daughters. There is no one better to make a quilt for than those you love! To introduce myself, today I'll share a few quilts and other projects that I have designed.


This quilt is called In the Orange Grove. It started off with a new obsession with wool applique and moved on to mixing cotton with the wool. I've included reproductions along with Kaffe fabrics to add a whimsy to this traditional looking pattern. I really got out of the box on this one...my usual colors are reds, blues, greens, browns and tans. I love the mix of fabric styles and colors in this one. It was so much fun to work on!

These are the window treatments I made for our family room. The windows are facing east and the sun is blinding bright in the morning so I had to cover them very soon after moving into the house seven years ago. These add a personal touch to our home and keep us comfortable in the mornings since they prevent the sun from shining right into our eyes during our morning coffee.


Once the window treatments were finished, I had to try something new on our table! Our oak table was damaged in the move, and this was my old crafting table. It had paint globs and scratch marks and was very used and abused. It is over 50 years old and was my parents' first table. I gave it a stripping, then drew and painted the pattern from the window treatments on top, carved around the borders of the shapes, stained and varnished it and covered it with glass so it would not get damaged again! This is sitting just outside our family room. It is an old heirloom made new again.

This quilt is called Brookshire Star and is one of my favorites. This quilt matches my window treatments and kitchen table. Once the window treatments and table were finished, I had to make a quilt to go along with them! I'm not usually this matchy matchy, but it all coordinates well without being too much. The long room consists of the kitchen, dining and family rooms so all these items are spread out. This quilt is done all by machine; machine applique and machine quilting. I would like to make another someday with needleturn and hand quilt it for a more rustic look. Maybe I'll use some of the wools that I'm so in love with now!

~~ Happy May Day by the way!! This is my garden at the front door and my grand-dog Jersey on the left and my dog Ginger on the right!

That's all I'll post for now...I'll post more pics soon so we can get to know each other!