Showing posts with label starch method for English Paper Piecing. Show all posts

Monday, November 16, 2015

Sharp Points using Starch Basting for English Paper Piecing

Recently I've had a few people ask me about making sharp points when basting with Starch for English Paper Piecing. I use a simple process of holding the sharp points with the Fingertip Stiletto while I fold over the next seam. The pictures below wil hopefully help you understand. The color is a bit odd but I'm posting this while I have a chance!
The first picture shows how I start a shape, any shape, by drying the seam that is directly over the paper. Don't let the iron get out into the seam allowance so that it will stay damp and flexible.
For the second side of a sharp point, hold the first seam in place with the Fingertip Stiletto while you start to fold over the next seam with the iron.
Continue holding firmly while the seam allowance is folded all the way over the paper shape, pulling out the Fingertip Stiletto as you fold and iron dry.
And the last photo show how I've pulled out the Fingertip Stiletto and pressed the seam allowance flat, again, leaving the next seam to be folded over damp until it is folded over.
I hope that answers your questions! Let me know if you need more clarification. I'll be posting this to the tabs above for easy access.
Take care,
Missie
Www.traditionalprimitives.com
Social Media- FB, Pintrest, Instagram


Sunday, October 11, 2015

Glimpses Of The Past

We've taken a little time to be with my folks in Florida this week! We usually go to Destin, FL, but planning our trip at the last minute lead us to Panama City Beach this time. It's about 30 miles east of Destin but it seems like a whole new world. Here in Panama City Beach, the little beach town makes me think of old time movies that I used to love watching. I can just see some of the movie stars of yesteryear hanging out in a place like this! The building next to ours looks like it was quite something when it would have been new in the 50’s! I can just see Dean or Doris singing a little sweet song in an old movi in a setting like this!
The town is full of old tourist buildings that are fun to see. Of course the new is mixed in as well, and we are loving Starbucks right across the street! The sunsets are beautiful!
I got a few looks from folks when I was stitching on the beach yesterday! But hey, a girl's gotta stick when she has time right?! Here's a glimpse of my next quilt. I'm not quite sure what it will be when it's finished, but it sure is fun to piece these 1/2" hexes that I've Starch Basted! I've been making these as my demo in my booth while vending and I'm finally stitching them up to make a new quilt.
Speaking of Vending, I'll be heading to Houston in a few weeks for Quilt Market and also Festival. If any of you are going, please look me up! I'm in row 2400 for both events.
My new quilt, French Diamonds is completed and I'll be very excited to hang it in my booth. It's a pretty simple quilt to make and a nice take on an old Pennie Rug style quilt. You can see that the "Pennies" are Diamonds instead!
The clusters of Diamonds seem to look 3 dimensional, which was a nice surprise as I started stitching each block! Fun Surprise! The pattern is available on my website if you are interested!
Thanks for stopping by and I'll try to post again soon! Be sure to follow me on Instagram & Facebook if you can. Posting in those medias are so much quicker and I'm able to post there more often. Of course i'll be posting here when I can!
Take care,
MIssie


Tuesday, July 14, 2015

Sharp Points with Blanket Stitch

Hey Everyone! I've been missing in action again with a super busy schedule of vending at quilt shows and family stuff. I just finished up my last show for a little while and I'm glad to be home to get some work done for a few weeks! The last show was right here near home and it was nice to be able to sleep in my own bed and have a friend help one day and my middle daughter home the next day. Unfortunately I didn't think to get a picture this time! And I even set up the booth a little bit differently. Oh well, I'll be sure to add TAKE PHOTOS to my to do list next time! I would have loved to have a picture of Melanie since she won't get to help again for a while as she is moving away shortly. We'll miss her being nearby.

Since having a few days at home, I've been able to do a little stitching on my next design. This quilt will be similar to Pennies In My Garden, but the "pennies" will be diamond shaped this time around.

As I'm stitching the cotton and wool layers together, I've figured out a better way to make sharp points when using the blanket stitch. I've prepared my cotton shapes using the starch method I use for EPP basting. Usually I prefer Needleturn for Applique, but I am learning to love the crisp sewing edges that come with basting with starch. It makes sewing the Applique down effortless for the most part! These pre set points also help make a better point, but the stitching is also important. I'm sure I will still use Needleturn Applique in the future, but for this quilt, I'm enjoying using my Starch Brush to prepare the seam allowances. Now back to the sharp points...

After reaching the point and pulling the last blanket stitch tight, I'm taking another very tiny blanket stitch right at the point. The thread I prefer using for wool Applique is Genziana so it is very thin compared to floss or pearl cotton. This may too bulky of a stitch to take at the end of a point if you use floss or pearl cotton, but it's worth a try to make a sharp point.

Next I'm using the needle to tuck under any seam allowance poking out from behind the Applique shape.

Then I'm holding the tip with the hidden seam allowance very firm so that seam allowance won't poke out again!

Then proceed with a few more stitches. New topic for a moment... Notice the blue wool point above the one I'm discussing and how it is a bit bulging out of the stitches? I'm going to trim that excess away very carefully. Notice in the next picture how much better it looks compared the the picture above.

In this pic you can see how nice the red cotton fabric point looks with this locking blanket stitch after its stitched. You can also compare this point to the yello point with no locking stitch. (Yes, I'll go back and lock that one!). And finally you can compare the blue wool point in this picture to the previous picture to compare points before and after a trim.

Just a little tid bit of info I've learned lately. Hope it helps you also!

Take care,

Missie


Wednesday, April 29, 2015

Busy Days

I know it seems like I have fallen off the planet, but I am still here plugging away at my little business. As I take a few moments this morning with my coffee and iPad, this is my view from my recliner.

It's been a big tan wall for quite a while as I've been vending and taken all my favorites to a few trunk shows and lectures. I'm retiring this pattern from my booth, so will get to enjoy Charmed Beginnings on my wall for a while! When I finish new designs something has to give in my booth, so I'll start retiring the older quilts to a warm and cozy spot in my home. You can still purchase this pattern from Blackberry Primitives if you are interested. They asked me to design a quilt using their wools and it was a great experience. This is the cotton version I made for displaying in my booth. It has a smidge of wool but is mostly cotton. The 100% wool Applique version is shown below the cotton quilt.


This quilt celebrates the colors and qualities of new spring which is happening right now around here. It's amazing to wake to freezing temps one week and suddenly the next week we wake to birds singing and trees bursting with buds and blooms. My iris are shooting up inches every day and soon they will be bursting with blooms as well!

This blooming tree looks a bit small in this photo, but it is good sized and we are so happy to enjoy the blooms this year. Many years it will be hit with the last frost of the winter season and the blooms are taken before we can enjoy them. Soon, they will be blowing away in the wind, so we enjoy an evening drink on the porch to enjoy the beauty that spring brings.

My days have been spent preparing for Quilt Market, making sure I have enough patterns on hand. The pile below does not look very organized, but it is very organized in the placement of which patterns will be packaged for Sample Spree and which will be placed in the booth as we set up. There is a method to my madness! And believe me, this is a neat pile compared to a few days ago! Haha! That means I am making headway and will be ready sooner than later! I am ready to be finished so I can get back to sewing something new!

While unpacking my vending goodies, I decided to display these punched rugs on my wall in the office so I could enjoy them for a while also. It's showing me that soon the mess you see above will be packed up and I can have a nice clean space again! Those patterns above have been taking over the house the last few weeks!

Today I'll be stamping the Punchneedle Designs on the weaver's cloth, so I'll be able to finish up the pattern prep today. If you are headed to Quilt Market in Minneapolis, please look me up! I will be in booth 140 right next to the food court doing my demo on basting English Paper Piecing with Starch.

I'd like to put out a call for comments on my Starch Brush. If you've used it could you please email me at missie@traditionalprimitives (dot) com and let me know how you like it? I would like to print some comments for testimonials to post in my booth. Same request for those of you who have gotten a start on The Gardens Of A King? Since this is a new technique I would like the store owners to see how much people love this method for preparing English Paper Piecing. I won't print your email addresses or violate your privacy in any way of course! Be sure to email me as I can not print comments from the posts below.

One more shout out for a new magazine being published very soon. It's called Punch Needle and Primitive Stitchery Magazine and I'll have a new project in the premier issue! Be sure to get subscribed if you are a lover of primitive stitching and Punchneedle! Click HERE to get to the website and subscribe. This magazine will be a great addition to your current subscription of Primitive Quilts and Projects Magazine! It's so wonderful to see Punchneedle making a comeback. I am on a mission to get it exposed to as many people as possible to keep the beautiful and simple art alive and well!

Thanks so much for stopping by today. I promise it won't be too much longer and I will get back to posts about stitching! I can't wait to get at it again...my fingers are itchin' to get stitchin'!

Take care,

Missie


Thursday, April 2, 2015

Back In The Saddle!

Wow! It's been a while since I've had time to blog! Wish I had some new sewing to show you, but I have not had time to do any quilty sewing. Today is English Paper Piecing club at the local quilt store, Creekside Quilting, so I will be finding a few minutes to stitch this afternoon thank goodness. Sewing at home this week has been spent on smocking 3 little dresses for some relatives. It brings back so many great memories of when I used to make most all of my girls' clothing when they were young. The picture below is a little peek as the dresses are a bit of a surprise for the girls' mom. When she receives them I will try to get a photo of the girls in the dresses. It was fun to get the pleater out again and sew these sweet little dresses! Do any of you smock ?

Last weekend I was off on another vending trip to Bloomington, IL. What a fun bunch of ladies! Everyone was very excited to be at the show and very interested in learning a little something new.

My set up was a wee bit different this time. It was so nice to have enough room to lay things out instead of on top of each other! There was actually room to have all the items separated into 'departments' and actually see all the items!! The booth was 20' long which was a treat! What you see above is not the entire space allowed. Next weekend I will be in Stover, MO at "It's A Gatherin'" and I will have to squeeze back into an 8' x 8' space. Now how will I do that?! LOL. I'm sure I will figure it out! And the shopping will be just as exciting!!

We actually had enough space to display the Punchneedle quilts all on their own. So nice to let them show off for once!!

My helper and I got to sit next to each other and visit easily now and then, which was pretty nice also!! I did the demos on the left side of the brown table and she ran the register on the right.


While doing the English Paper Piecing Basting with Starch demo, I usually work on 3/4" hexies. But this time I decided to work on hexies that I will actually use for my next little quilt. So the size this time is 1/2". Usually folks think the 3/4" is small, but this time I really heard that comment often! You can see the 3/4" hexies below on the bottom left of the picture. The 1/2" hexies are the others.

I just want to throw out a reminder that any time we are stitching by hand, smaller pieces are easier because all we want to be concerned with is the next stitch ahead of our needle, right?! If we have a large piece of paper with fabric basted around it in our hands a larger piece won't fit easily, right? So smaller is simpler in this case Vs a 2" or larger piece. Just focus on the next stitch ahead of your needle and take a deep breath! Don't forget to enjoy the process!

See that cutter up in the picture? That is a Fiskars Cutter. I have cut my little hexies out of a single layer of the C. jenkins Freezer paper. (If you cut a double layer of this strong freezer paper it will break the punch) Then I line up two hexies with shiny sides facing downward and then iron them together as I iron them to the wrong side of the fabric all in one step. It works great! These cutters are available in 1/2", 3/4" and 1" size. They are now listed on my website (Click Here) if you are interested! It is a fast and accurate way to cut hexies!

Here is my little box filled with cute little hexies that were SO easy to baste using my starch method! That pile of finished hexies is about 2" deep, All done while doing the demo in the booth!! It's so fun to make these!

Have a great day and thanks so much for stopping by today!!

Take Care,

Missie


Thursday, January 15, 2015

Finished Table Runners!


I've been working hard to finish the new Table Runners for the workshops! This one below is called Grannie's Flowers and is for the Garland Guild's Workshop on English Paper Piecing-5 Ways and More. I will teach them all sorts of hints and tidbits about English Paper Piecing, including my favorite way of basting with Starch! The center is English Paper Pieced and the outer flowers are wool and cotton appliqué.

The runner below is the Pennies In My Garden Table Runner to go along with the larger quilt called Pennies In My Garden and it is wool and cotton Appliqué with layered pennies and florals. This class is for the workshop at Happiness Is...Quilting! And they will learn the way I like to build a layered wool quilt. These cotton penny parts have a finished seam allowance.


It was nice to make something smaller after making The Gardens Of A King last year. Sometimes it's good to do something simple for an easy, quick project!!
Don't forget you can find me on Pinterest, Yahoo Groups, FB and Here! Pick your favorite social media and follow along and participate as I create new patterns for you!

Take care,

Missie


Monday, November 24, 2014

The Pattern is Ready! And My Quilting Machine!

Just a quick mention to let you know The Gardens Of A King pattern is ready for you!

A little bit of wool appliqué for you! Cottons and wools...mmmm...
 
A little bit of hand appliqué for you! More cottons and wools....mmm...
 
A little bit MORE than a little bit of English Paper Piecing! English Paper Piecing with starch...mmmm...

A few nights of relaxing and rewarding stitching for you while working on

The Gardens Of A King,

an interpretation of

The King George III Coverlet!

Click Traditional Primitives to see the details!

My husband and I have been spending a little time "jerry rigging" my quilting machine! I purchased a stitch regulator and we got it installed 100% on Saturday morning! This is longarm quilting on a budget for sure! I would love to have a fancy, wonderful quilting machine, but for now this is what I have to quilt my own quilts. It's a Bailey Home Quilter and is just a basic quilting machine. But that's all I need for now. The stitch regulator worked wonderfully and it was much less stressful to do a little quilting!


The quilt loaded on the machine is a small wall hanging sample for one of my workshops I'll be doing in February in the Garland, Texas area. This is a cut away appliqué technique making the zebra appliqué much easier to sew in place! This class will be taught at Sew Let's Quilt It. I'll be teaching The Gardens of a King at Happiness Is Quilting in McKinney, TX, and also will be doing the program and workshop at the Garland quilt Guild. Both stores will be having Holiday Open Houses in the coming days and some of my quilts will be on display. If any of you live in the north Dallas area, be sure to stop by!

Please let me know if you have any questions about the new pattern. I'll be happy to answer them!

Have a wonderful day!

Missie


Saturday, November 8, 2014

The Gardens Of A King, Finale'

Thanks for being so patient with my teasers about this quilt! Here it is... My interpretation of the

King George III Coverlet, with permission from the V&A Museum in London, England

The Gardens Of A King

The quilt finishes about 63" square, not too big and not too small...challenging, but not too challenging, with a touch of easy stitching also...so rewarding along each step of the way to completion...

It's been a wonderful journey for me...imagining the life of the original maker, appreciating her talent to draw the blocks I've used in the quilt, imagining her quilting circumstances and environment...

A journey of enjoying the process of stitching these glorious shapes together into wonderfully rewarding blocks, creating a quilt I will always cherish...

Thanks so much to my pattern testers Karen and Carrie, who will also be showing more of their projects on their blogs. They've been so helpful to make sure the pattern is understandable for quilters who want to make the quilt. Visit their blogs and see their blocks!

The pattern is not quite done, but should be done very very soon. You know the drill...let me know if you want first notice of when it's ready to be shipped and I will keep you posted! But I need your email address, so be sure to email me that ifo if you don't hear back from me.

Thanks so much for coming back to see the grand finale' post about The Gardens Of A King. A quilt using English Paper Piecing, Appliqué and Wool Appliqué techniques in Cotton and Wool.

As always, take care!

Missie


Friday, November 7, 2014

The Gardens Of A King, Part 4

Ok, time for some more sneak peaks at my interpretation of the King George III Coverlet! Yesterday, I left you with a summary of the techniques used to make the quilt. To review, there is English Paper Piecing, Appliqué and Wool Appliqué involved in making this quilt, The Gardens Of A King.

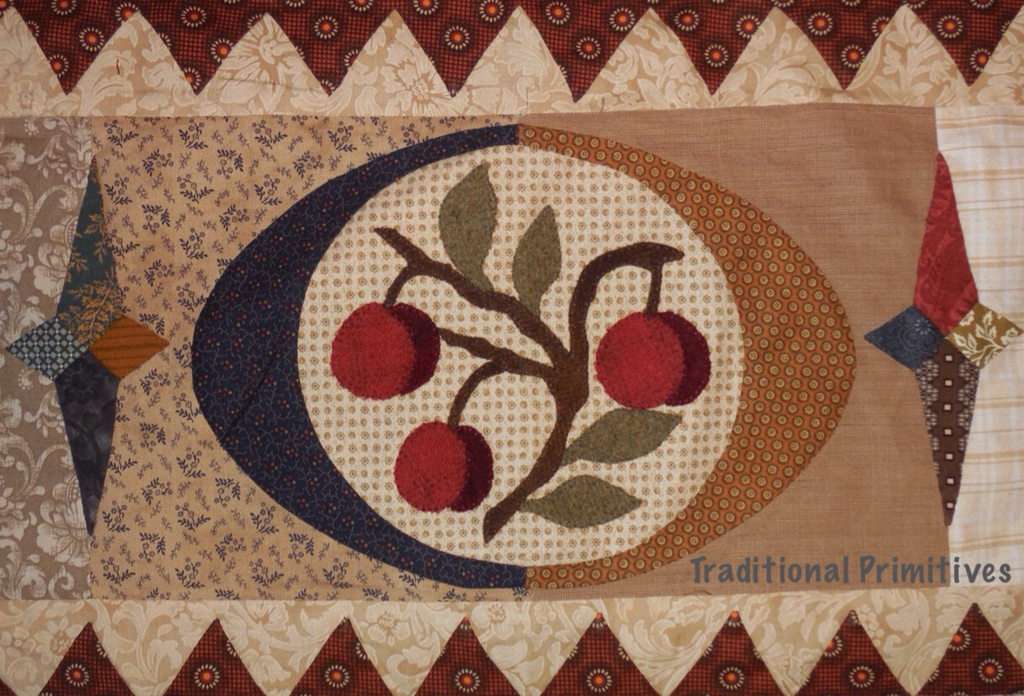
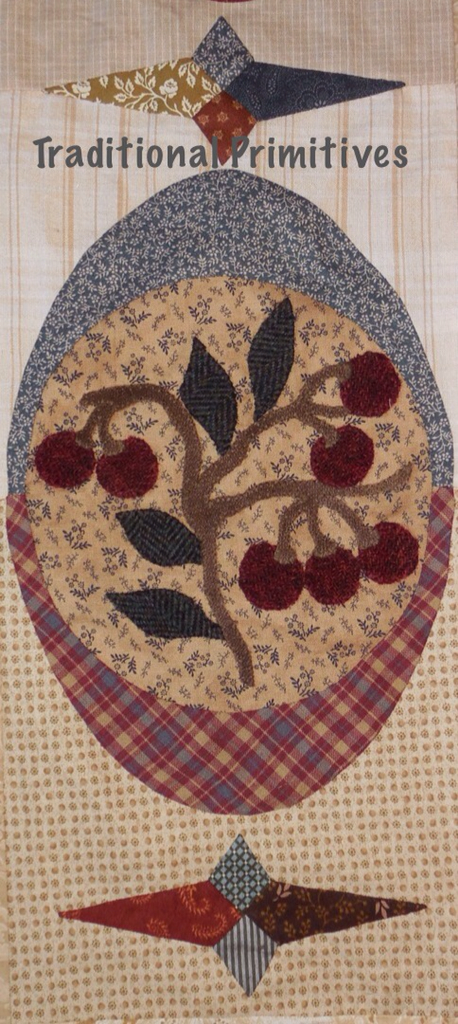
This picture shows a bit more of the two Appliqué techniques. Usually, I do cotton Appliqué using the needleturn technique, but for this one, since I was used to the crisp shapes from starching the EPP pieces, I decided I would try the starch method for the cotton appliqué also. A first for me. It was very nice to just stitch them on with no needle turn since the seams were prepared before they were basted to the background. Very quick stitching for sure! Either method would work just fine, but I wanted to try something new with the curved shapes of the crescents surrounding the Wool Appliqué. I did, however, use Needleturn for the some of the sharks teeth as well as starch for some of the others. I was experimenting. I would say the starched teeth are more precise, but the needleturn version quality is fine enough for me.

Making a quilt like this must be about enjoying the process! We love quilting and stitching because it is enjoyable! We may each love different methods of reaching the end of the project, but as long as we enjoy the journey, that's what it is all about! Right?!?

For me, this is definitely an English Paper Pieced design for the pieced blocks, but recently, I've met a woman who loves these type quilts, yet she prefers traditional hand piecing where she traces the shape and sews the pieces together with a running stitch! This traditional technique of piecing will absolutely work for this quilt! It's about the process of enjoying the work of making the quilt! I find myself often thinking about the original maker, wondering which type of piecing she used. She was, after all, from England so I do suppose she could have used English Paper Piecing to piece her blocks. I have tried to find out how old the technique is, but can't seem to find any information about a quilt known as the first English Paper Pieced Quilt. If anyone does know this, I would love to learn about it from you.


There are also several ways to stitch Wool Appliqué. Many primitive artists use the blanket stitch with pearl cotton or 3 strands of floss. It's beautiful done that way, but I have decided I prefer my stitches to blend in with the wool. My quilt design style is a bit primitive to go along with the traditional, but a bit of a more formal primitive touch is how I see my style. With that said, I prefer to use wool thread when I do wool appliqué. I've used several stitches, but prefer a small, simple, whip stitch. You can see some of the thread shining in the flash of the picture above. But, whichever type of thread or floss you like, would work wonderfully on these appliqué blocks.

Some of the wool shapes are very narrow, so for these blocks, I used fusible Steam A Seam 2 Lite to hold them in place and seal the edges from raveling. Now that I've gotten rid of my 25 year old iron, the Steam a Seam worked great! Lots of steam IS the key, even when I thought I HAD lots of steam in the past! Most of the time, I prefer not to use fusible when I do Wool Appliqué because I prefer the softer feel. Again, it's all about enjoying the process and whichever way you prefer for the majority of these appliqués is what you should do! (I do highly recommend fusible for the stems though!)


Be sure to visit Karen and Carrie's blogs to see their updates about The Gardens Of A King that they've been working on. You'll see some great changes from mine to make it their own so that they enjoy the journey of making the quilt!

In the coming weeks I'll be posting some hints and reviews of how I prefer to do things. One of which will be sharp points like the few you see above! But first, I'll be posting the quilt top, The Gardens Of A King, for you tomorrow... Nice to see you here today and I hope to see you here tomorrow!

Until then,

Take care,

Missie